SSH key-based authentication with PuTTY
This tutorial describes how to achieve SSH key-based authentication with PuTTY. In details, describes how to generate and use a public/private key pair to achieve an SSH connection, from a Windows 10 Desktop to a remote Linux (Dedian 11) server using PuTTY. SSH connections based on RSA keys have advantages over simple SSH connections as they allow us to access the remote system without using login credentials while preventing any possibility of successful brute-force attacks.
Table of contents
1. Required Software
To complete the key-based SSH connection it is necessary to install PuTTY and PuTTYgen on the Windows system.
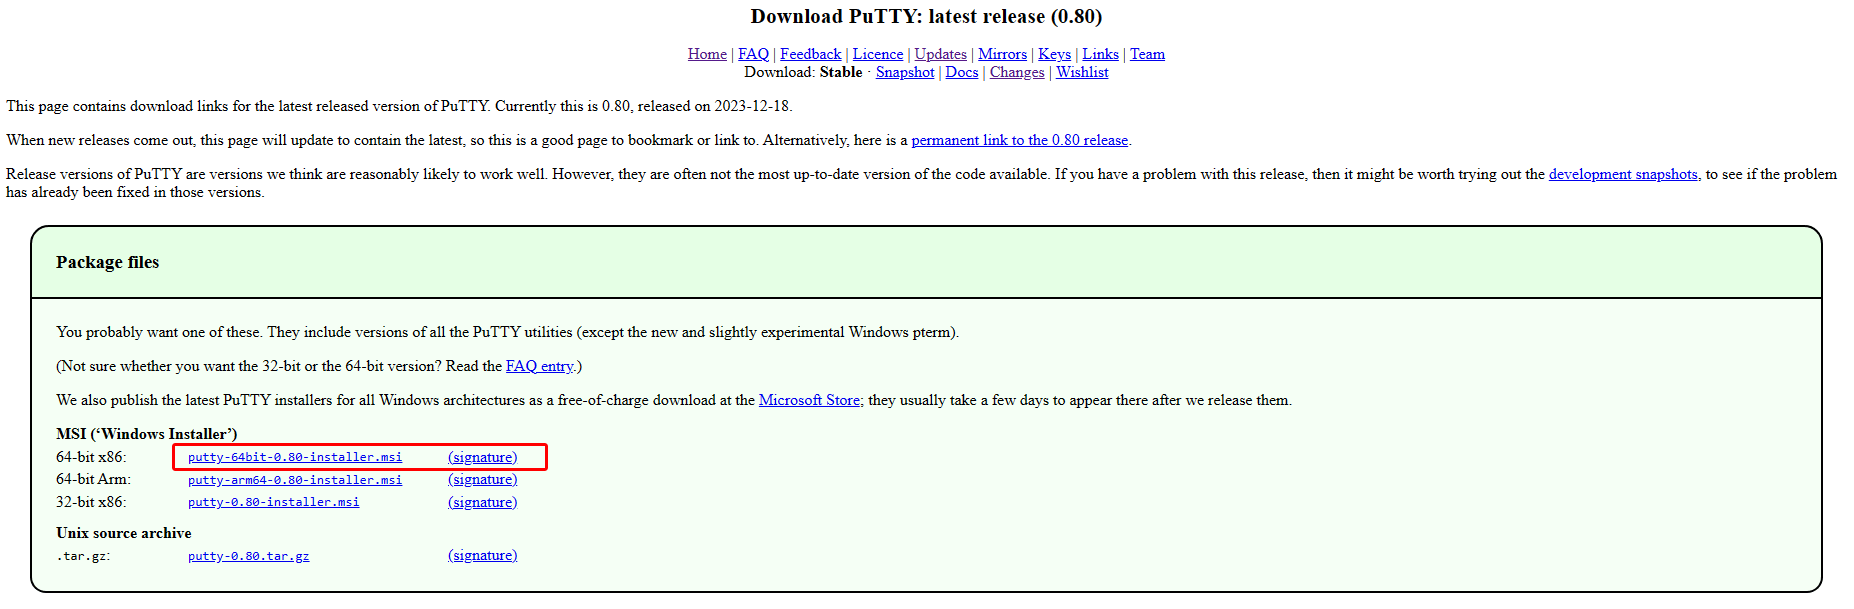
Download from the PuTTY downloads page, the MSI installer (in our case it is the 64-bit x86: putty-64bit-0.80-installer.msi).
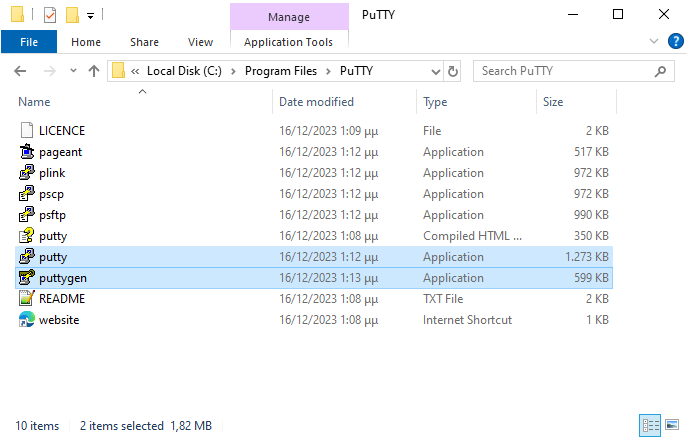
Once downloaded, we install it on our computer. After a few minutes, when the installation is completed, all the necessary programs will be present on our system. By opening the installation folder C:\Program Files\PuTTY we have access to all programs.
We create desktop shortcut for PuTTY, that we will need to use frequently.
2. Creating a configuration profile in PuTTY
In PuTTY we can create configuration profiles for each of our remote servers. The profiles help us as they store all the connection settings on the server, without having to re-enter them every time we want to connect. To start, open PuTTY by double-clicking on the putty.exe file.
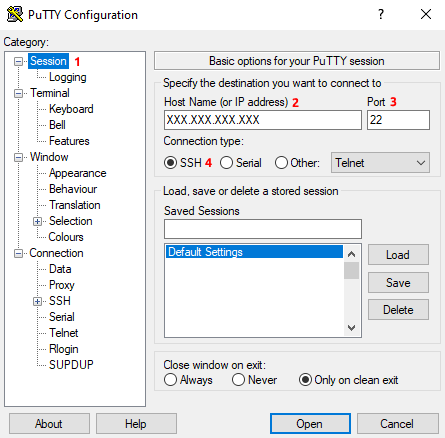
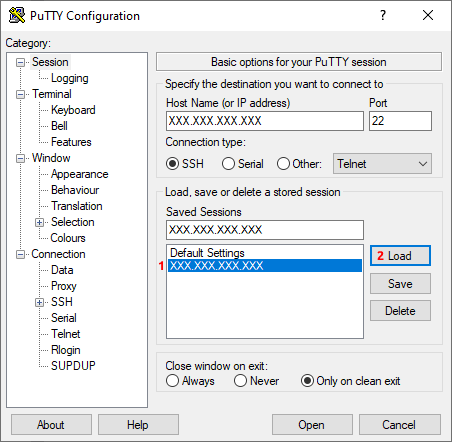
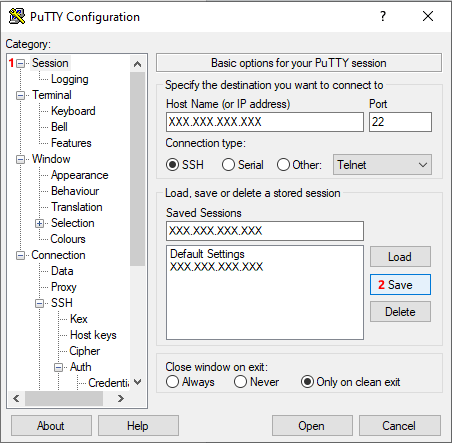
- Select the Session category in the left column (image 1, 1).
- In the Host Name (or IP address) field (image 1, 2) fill in the details of the remote server (XXX.XXX.XXX.XXX is the IP that appears in the tutorial images and you will replace it with your own).
- The Port field (image 1, 3) is the default value for SSH connections and is 22 and
- Connection type select SSH (image 1, 4).
- Next, we go to the Connection > Data category (image 2, 5 ) where:
- Fill in the Login details in the Auto-login username field (image 2, 6) with the desired username of the login. In the tutorial I use root.
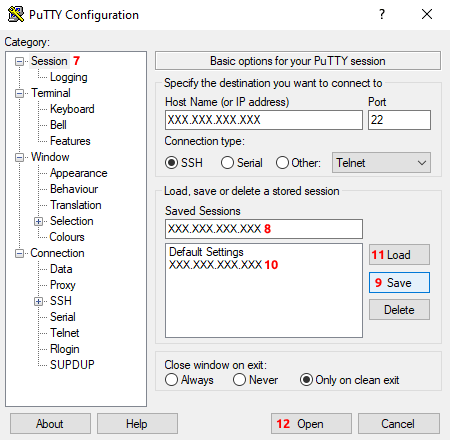
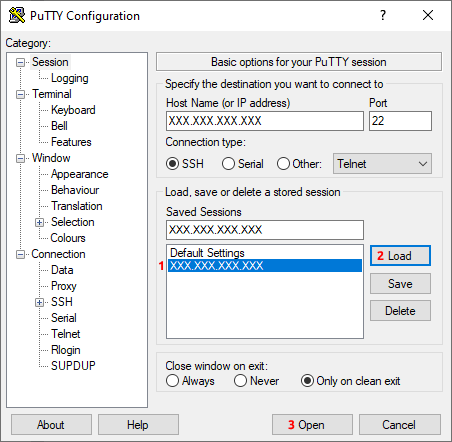
- Afterwards we return to the Session category (image 3, 7) where
- we fill in a friendly name for the connection in the Saved Sessions field (image 3, 8) and
- we press Save button (image 3, 9) to save our connection.
- The next time we want to use this connection, we simply select it by clicking on it in the Saved Sessions list (image 3, 10),
- we load it by pressing the Load button (image 3, 11) and
- we open it by pressing the Open button (image 3, 12).

3. SSH connection to the server
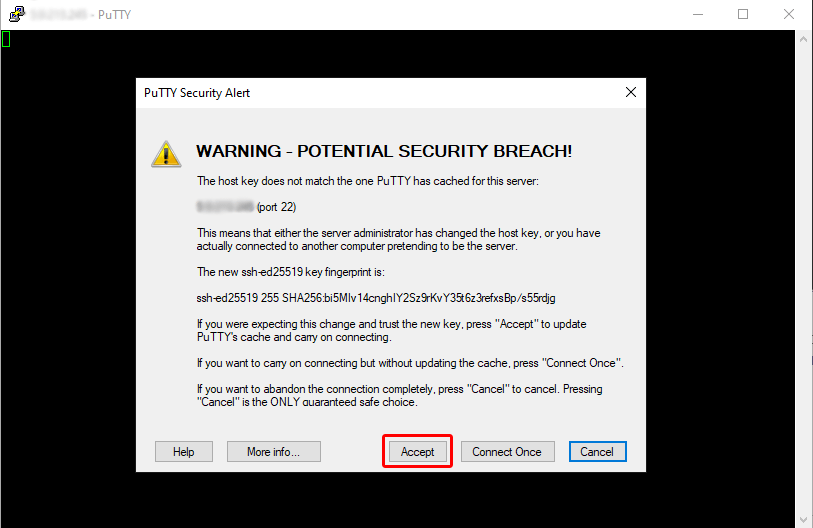
Now we are ready to open an SSH connection to the server. During our first SSH connection we will get a warning message.
This is because PuTTY does not yet know the server's host key. It is completely safe to choose Accept (Image 4). But remember that you will receive the same message if the server host key is changed.
The SSH connection will be opened and since we set a username earlier when setting up PuTTY, we now need to enter the login password. If the password is correct we have connected to our server. However, our login is using username & password and not key-based. Anyone who knows these details can log into the server.
4. Create a public/private key pair
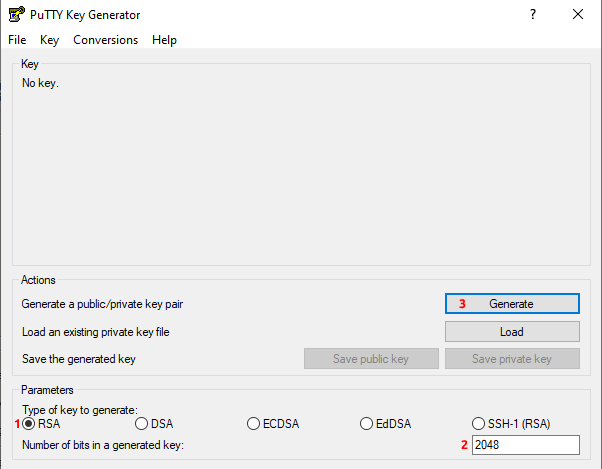
To generate the RSA public/private key pair we will use PuTTYgen. We start the program by double-clicking on puttygen.exe, located in the PuTTY installation folder, in our case the C:\Program Files\PuTTY.
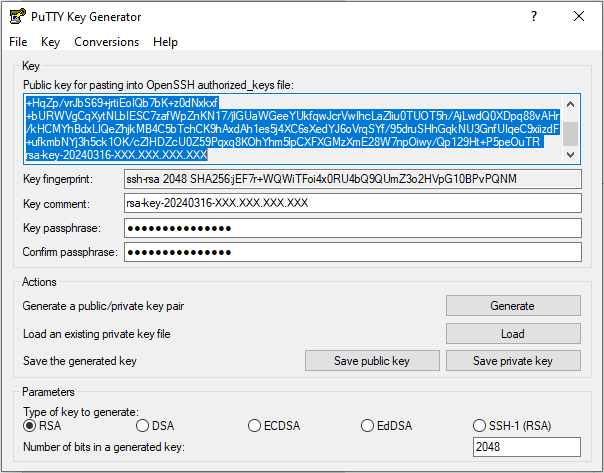
Make sure that the Type of key to generate is set to RSA (Image 5, 1) and the Number of bits in a generated key is 2048 (Image 5, 2). Then press the Generate button (Image 5, 3).
When creating the key (Image 6) , the program encourages us to move the mouse pointer over the empty area to create some randomness:
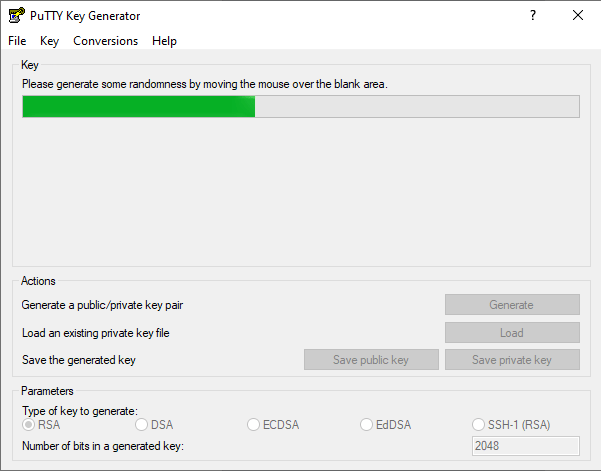
The process will be completed shortly and then we need to:
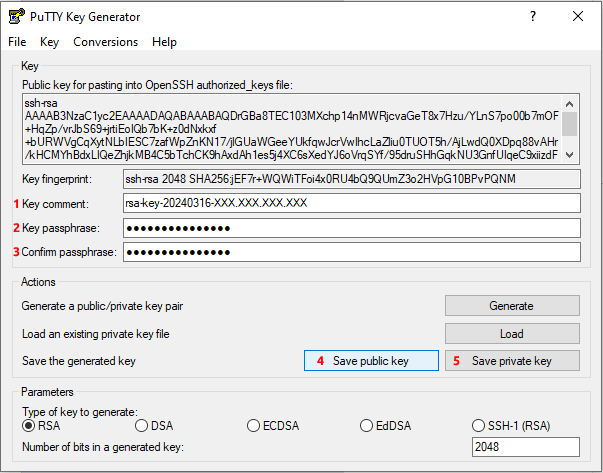
- Fill in the Key comment field (Image 7, 1). The value you enter can be any value, e.g. your email address or any other value.
- Enter a password in the Key passphrase field. (Image 7, 2). We need that password to log in to SSH with your new key.
- Confirm the password in the Confirm passphrase field (Image 7, 3).
- Save the public key by pressing the Save public key button (Image 7, 4). It doesn't matter what name or which folder on the computer you choose to store the key in.
- Save the private key by pressing the Save private key button (Image 7, 5). Select the file name and save. It doesn't matter the name or which folder on the computer you choose to save the key to.
Make sure that the keys have names that will help you understand in which system they belong, and that they are stored in a folder that you can easily find.
Attention, in case you lose your keys and you have completed this tutorial, you will no longer be able to access the remote server.
Next, copy the key from the PuTTYgen window (Image 8).
5. Save the public key on the server
Earlier we were connected to the server, but if your connection was closed for some reason please reconnect. You can still use the username & password.
Paste the RSA key into the ~/.ssh/authorized_keys2 file. Follow the steps below:
mkdir ~/.ssh
chmod 700 ~/.ssh
nano ~/.ssh/authorized_keys2
and paste the previously copied key. For example:
ssh-rsa AAAAB3NzaC1[…]HIrJojEhV5B/ rsa-key-20240316-XXX.XXX.XXX.XXX
This file must be writable/readable only by this user, so we run the command:
chmod 600 ~/.ssh/authorized_keys26. Attach the private key to the PuTTY profile
Launch PuTTY again and load the profile you saved earlier (Image 9, 1-2).
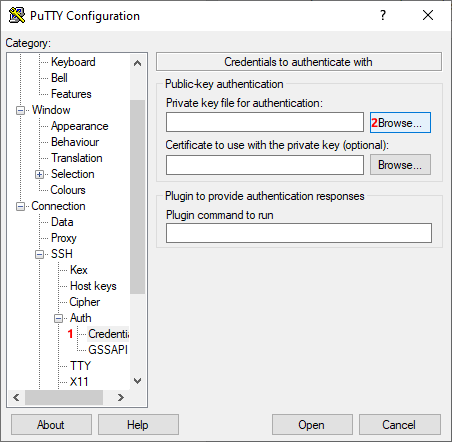
Go to category: Connection > SSH > Auth > Credentials (Image 10, 1) and press Browse button (Image 10, 2).
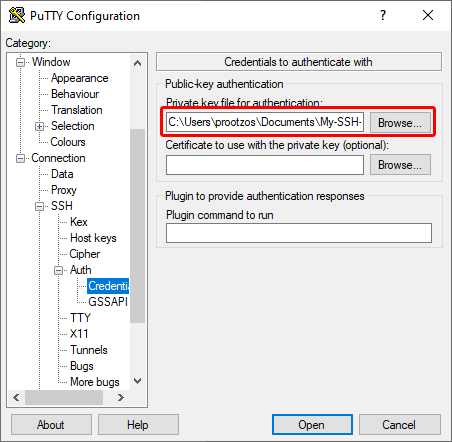
Browse your file system and select your previously created private key (Image 11):
Select the Session category (Image 12, 1) again and press the Save button (Image 12, 2) to save the changes to the profile.
7. Key-Based SSH Login
Everything is ready for the first key-based SSH connection to the server. With PuTTY ready we press the Open button (Image 13, 3).
As you can see (Image 14), the public key is now used for authentication and you are prompted for the passphrase (the password you specified in chapter 4):
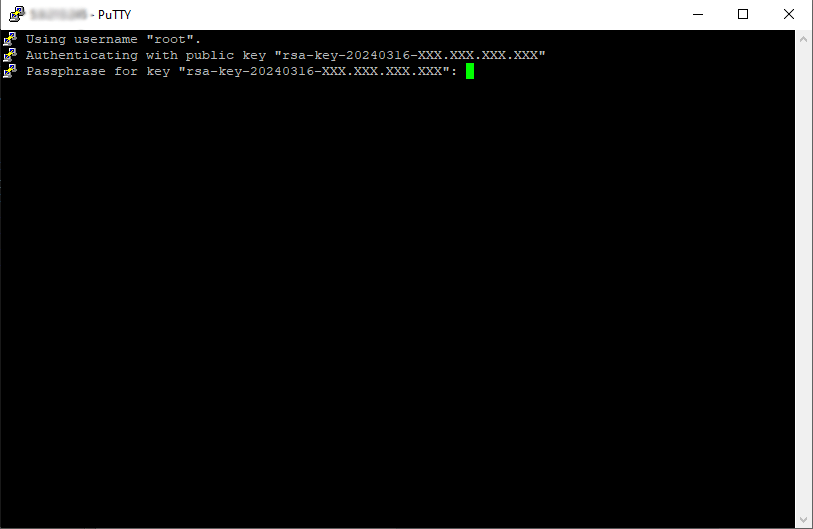
PuTTY, has the pageant program that makes it much easier to use. For example you can use Pageant to store the passphrase of keys.
8. Disable SSH login with username/password
At this point we can connect to the server using the public/private key pair and also using username & password. If no one else is logged into the server and we want more security, we need to disable the username/password SSH authentication.
To disable this feature, we need to modify the SSH server configuration file. On our system (Debian 11) and on Ubundu systems this can be done via the /etc/ssh/sshd_config file.
nano /etc/ssh/sshd_configAnd set the following entries to no:
ChallengeResponseAuthentication no
PasswordAuthentication no
UsePAM no
Then restart the OpenSSH server:
systemctl restart sshdYou can no longer log in using a username/password, and you can see this if you try to open a new SSH connection, without the private key configured.
That's it, SSH key-based authentication with PuTTY is ready.
Third-party logos and marks are registered trademarks of their respective owners. All rights reserved.